Now this is the way I install my programs that I get from tar.gz's. This is also how I add the extra features to give me the feeling that I installed it through synaptics, and what I mean by that is that this guide not only covers how to install Songbird, but also how to add it to your menu and how to be able to run it from your command line, with just "songbird."
Step 1: Download the newest songbird available, and save it to your Desktop. You can get it from http://www.songbirdnest.com/
Step 2: Next we are going to untar the file to /opt/, that's where I put the applications that I install. Here is the command:
sudo tar -xvzf Songbird*.tar.gz -C /opt/
Step 3: This is going to change the permissions to make sure we have access to the folder where songbird is installed.
sudo chown -R username:username /opt/Songbird/
Of Course substitute username, for your actual user name. That should be the basic install of the program, but if you want to add the extra features that I was talking about at the beginning of this tutorial, then go ahead and keep on reading.
Step 4: Now we are going to add Songbird to the menu. So it can be accessed by going to Applications > Sound & Video menu.
Go ahead, and Right-Click your Menu Bar and select Edit Menus.
Once the new window opens up, on the left column (labelled Menus), click on "Sound & Video." Then on the right hand side, click on the button "New Item." The "Create Launcher" window should pop up. Fill out the information like so:
Type: Application
Name: Songbird
Command: songbird
Comment: Open Source Audio Player and Web Browser
For the icon, all you have to do is click the left box, it sort of looks like a spring and type this into the address bar
/opt/Songbird/songbird-512.png
Hit OK, and close out the Menu Editor window.
The next few steps are to run songbird from the command line, just by typing in songbird, just like any other application. Start off by typing this into command line:
sudo gedit /usr/bin/songbird
Add this following text to the file:
#!/bin/sh
/opt/Songbird/songbird "$*"
Save and close the window out, and then run this command:
sudo chmod +x /usr/bin/songbird
... and thats it, now you have Songbird fully installed on your system, Good luck! Most of thanks goes to Artifacial Intelligence, for showing me the layout to this guide, most of the credit should go to him, I just changed a few things.
Monday, March 3, 2008
Sunday, March 2, 2008
How To: Change the default Ubuntu menu icon.
So it seems that many people are having a hard time changing the default Ubuntu menu icon, to something that they prefer. Well here in this guide I'm going to show you the proper steps to set up your icon theme to display the menu icon of your choice.
Here is a before screenshot:
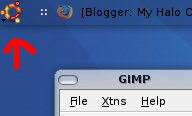
So that is the mysterious icon that we are trying to change. So here we go ...
Step 1: Know what current icon theme you have, and where the location of it is. For example lets say I'm using an icon theme called "osx". If I installed that theme by myself it would be under /home/username/.icons/osx
So go ahead and find out what theme you are using, if you don't know, you can check by going to System> Preferences > Appearance then click on "Customize " and then click on the tab called "icons" this will tell you your current icon theme.
Step 2: Have the current image you want to use as the icon ready in a place that is easy to find, like your desktop.
Step 3: Create the proper folders in your icon themes folder. So like I was saying before, let say my theme is osx, right now its located in /home/username/.icons/osx . I need to create two folders in that osx folder.
So make a folder named "scalable" without the quotes, and then inside the "scalable" folder make a folder named "places"
So in the end you should end up with something like /home/username/.icons/osx/scalable/places
Step 4: In the places folder is where you want to drop the image you want to use as the icon. Now when you do this all you have to do is name that image "start-here.png" or "start-here.svg", once again without the quotes .
After that, open up a terminal and type in the following command to refresh you gnome panel:
killall gnome-panel
this should be your end result:
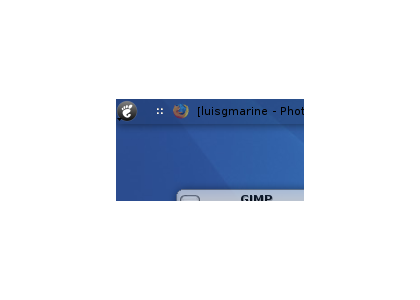
Follow this for all your icon themes that you have. Just make sure you have those two folder created inside your icon themes and name the icon you want to use start-here.png/svg, which ever extension, doesn't matter.
Until next time, enjoy!
Here is a before screenshot:
So that is the mysterious icon that we are trying to change. So here we go ...
Step 1: Know what current icon theme you have, and where the location of it is. For example lets say I'm using an icon theme called "osx". If I installed that theme by myself it would be under /home/
So go ahead and find out what theme you are using, if you don't know, you can check by going to System> Preferences > Appearance then click on "Customize " and then click on the tab called "icons" this will tell you your current icon theme.
Step 2: Have the current image you want to use as the icon ready in a place that is easy to find, like your desktop.
Step 3: Create the proper folders in your icon themes folder. So like I was saying before, let say my theme is osx, right now its located in /home/username
So make a folder named "scalable" without the quotes, and then inside the "scalable" folder make a folder named "places"
So in the end you should end up with something like /home/
Step 4: In the places folder is where you want to drop the image you want to use as the icon. Now when you do this all you have to do is name that image "start-here.png" or "start-here.svg", once again without the quotes .
After that, open up a terminal and type in the following command to refresh you gnome panel:
killall gnome-panel
this should be your end result:
Until next time, enjoy!
Subscribe to:
Posts (Atom)